I Send tokens from an exchange or another wallet to Phantom wallet and they don’t appear

User Question:

I recently sent some tokens from an exchange to my Phantom wallet, but they haven’t shown up yet. I’m worried that I might have sent them to the wrong network or there’s an issue with the transaction. How can I troubleshoot this situation and ensure my tokens are recovered or correctly received in my Phantom wallet?

Solution Tutorial: Troubleshooting Unreceived Tokens Sent from an Exchange or Another Wallet to Phantom

When you send tokens from an exchange or another wallet to your Phantom wallet and they don’t appear, it can be quite alarming. However, there are several steps you can take to troubleshoot this issue and hopefully recover or find your tokens.

Step-by-Step Guide:

  1. Verify the Receiving Address:
    • First and foremost, ensure that the address you provided for receiving the tokens in Phantom was copied correctly from your wallet. Solana addresses are case-sensitive, so even a minor mistake can lead to issues. Double-check each character.
  2. Check the Network:
    • When sending from an exchange, it’s critical to select the correct network. Exchanges often default to different networks (like Bitcoin, Ethereum, Base, or Polygon), which could result in tokens being sent to an incompatible network. Ensure the network you selected matches the one your Phantom wallet is configured for.
  3. Use Blockchain Explorers:
    • Use blockchain explorers like Solscan for Solana, Etherscan for Ethereum, Polygonscan for Polygon, or Basescan for Base to track your transaction. Enter the transaction ID (TXID) provided by the exchange to view transaction details. Here’s how:
      • Solana (SOL): Go to Solscan, search your wallet address, and check the Portfolio tab.
      • Ethereum (ETH): Visit Etherscan, enter your wallet address to see your ETH balance and ERC-20 tokens.
      • Polygon (POL): Use Polygonscan to check your wallet’s token holdings.
      • Base: Check Basescan for transaction details and token balances.
  4. Confirm Transaction Details:
    • Look for the transaction on the explorer. If it’s not listed, it might not have been sent or there was an issue. If listed, verify:
      • The sender’s address matches the exchange’s address.
      • The recipient address is your Phantom wallet address.
      • The network is correct (as per step 2).
  5. Transaction Status:
    • Check if the transaction is confirmed or pending. Bitcoin transactions might take longer, sometimes up to a few hours due to network congestion or low fees.
  6. Hidden Tokens:
    • In Phantom, if you scroll down in the token list, there’s an option to ‘Manage token list’. Sometimes, due to security measures, tokens might be hidden. You can unhide them if they appear in this list.
  7. Contacting the Exchange:
    • If you’ve confirmed all details and the tokens still aren’t in your wallet, reach out to the exchange’s support. Provide them with the transaction details, including the TXID, and ask for assistance. Sometimes, exchanges can help recover tokens sent to the wrong network or address.
  8. Recovery Steps for Unsupported Networks:
    • If you mistakenly sent tokens to a network Phantom doesn’t support, you’ll need to:
      • Use another wallet that supports the network where your tokens are stuck.
      • Import your Phantom wallet’s private key or recovery phrase into this wallet to access the funds.

Important Considerations:

  • Case Sensitivity: Remember, Solana and Bitcoin addresses are case-sensitive. A slight mismatch can cause tokens to be sent elsewhere.
  • EVM Addresses: Ethereum, Polygon, and Base addresses are not case-sensitive, but always ensure the entire address matches.
  • Patience: Blockchain transactions can take time, especially with network congestion. If everything looks correct, sometimes waiting a bit longer can resolve the issue.

By following these steps, you should be able to troubleshoot and potentially recover or locate tokens that haven’t shown up in your Phantom wallet from an exchange or another wallet. Always double-check details before sending crypto to avoid such issues in the future.
How to migrate my funds to a new wallet with a new SRP using Phantom, ensuring my assets remain secure

User Question:

As a Phantom wallet user, I’m concerned about the security of my crypto assets. I’ve heard that migrating to a new wallet with a new Secret Recovery Phrase (SRP) can enhance security. However, I’m unsure about the step-by-step process to do this safely. Can you provide a detailed guide on how to migrate my funds to a new wallet with a new SRP using Phantom, ensuring my assets remain secure?

Solution Tutorial: Safely Migrating Funds to a New Wallet with a New Secret Recovery Phrase in Phantom

Migrating your cryptocurrency to a new wallet with a new Secret Recovery Phrase (SRP) in Phantom is a prudent step for enhancing the security of your digital assets. This process helps protect against potential security threats, compromised phrases, or simply to update your security protocols. Here’s how you can do it safely:

For Browser Extension Users:

Backup Your Current SRP and Private Keys:

Before you start, ensure your current Secret Recovery Phrase (SRP) and any imported Private Keys are safely backed up. This is crucial for recovery in case something goes wrong during migration. Double-check each word and the order of your SRP to avoid errors.

Create a New Wallet:

Open Phantom in your browser. Click on the wallet icon at the top right to open the settings, then select ‘Create a New Wallet’. Follow the prompts to generate a new wallet. Importantly, securely back up this new SRP; treat it as your ultimate key to the wallet.

Add Old Wallet as Secondary:

After setting up your new wallet, you’ll need to add your old wallet as a secondary account. This can be done by selecting ‘Add/Import Account’ in the settings and entering your old SRP. This step allows you to transfer funds from your old wallet.

Transfer Funds:

With both wallets accessible in Phantom, transfer all your funds from the old wallet to the new one. Ensure you transfer the correct assets by verifying the network and token addresses.

Remove Old Wallet:

Once all funds are safely transferred, go to ‘Manage Accounts’ in the settings, select your old wallet, and remove it. This step is crucial for security, as it removes any link to the old SRP.

Securely Dispose of Old SRP:

After removing the old wallet, securely dispose of your old SRP. This could mean physically destroying any written copies or securely erasing digital backups to prevent misuse.

For Mobile App Users:

The process is slightly different for mobile:

Backup Current SRP:

Ensure your current SRP and any Private Keys are backed up. Double-check the accuracy to avoid recovery issues.

Uninstall Phantom:

Delete the Phantom app from your device. This step ensures a clean start with no residual data from your old wallet.

Reinstall Phantom:

Download Phantom again from the official website or app store. This ensures you’re using the latest, most secure version of the app.

Create New Wallet:

On first launch, choose to create a new wallet. Follow the instructions to generate and securely back up the new SRP.

Add Old Wallet as Secondary:

Add your old wallet by selecting ‘Add Account’ and entering your old SRP as a secondary account.

Transfer Funds:

Transfer all your assets from the old wallet to the new one. Check each transaction to ensure accuracy.

Remove Old Account:

Go to settings, find ‘Manage Accounts’, and remove the old account. This step severs any connection to the compromised or old SRP.

Secure Disposal:

Safely dispose of your old SRP to prevent any future unauthorized access.

Important Notes:

Never Share Your SRP: Phantom support will never ask for your Secret Recovery Phrase or Private Key. Keep this information confidential.
Double-Check Everything: Mistakes in copying or entering your SRP can lead to loss of funds. Be meticulous.
Stay Updated: Use the latest version of Phantom to benefit from the most current security features.

By following these steps, you can migrate your funds to a new Phantom wallet securely, ensuring your digital assets are protected with the latest security measures. Remember, maintaining the security of your crypto assets is an ongoing process, and regular updates to your security practices, like this migration, are essential.

How to Recover Crypto Sent to the Wrong Network with Phantom

If you’ve accidentally sent cryptocurrency to the wrong blockchain network using Phantom Wallet, don’t panic; recovery might still be possible with some technical know-how and prompt action. Here’s a detailed guide on how to navigate this common mistake and potentially recover your funds:

Understanding the Issue

Cryptocurrencies operate on specific blockchain networks, like Bitcoin, Ethereum, or Solana, each with its own protocol, wallet address format, and token standards. When you send a token to a wallet address on an incompatible network, your funds become inaccessible on the intended network but they’re not lost. For instance, if you send an ERC-20 token like USDT to a BEP-20 address on Binance Smart Chain, the tokens will exist on the Binance Smart Chain, but they won’t show up in your Phantom Wallet which is set for Ethereum.

Steps to Recover Your Crypto

Check Transaction Details: First, use a blockchain explorer like Etherscan or Solana Explorer to verify the transaction details and confirm where your funds were actually sent. This step is crucial to understand the situation fully.
Wallet Compatibility: If your Phantom Wallet supports multiple networks, try switching to the correct network to see if your funds appear. Phantom supports various blockchains, including Solana, Ethereum, and others, which means you might be able to access your tokens by simply changing the network within Phantom.
Cross-Chain Tools: If the funds are on the wrong network but accessible, consider using a cross-chain bridge. These tools can facilitate the transfer of assets between different blockchain networks. Ensure you use a trusted and reputable bridge to avoid further complications.
Contact Support: If you’ve sent funds to an exchange wallet or if you’re unable to recover the funds yourself, reach out to Phantom’s support team or the exchange’s customer service. They might be able to assist in manually recovering your tokens, although this process can be time-consuming and might involve fees.

Preventive Measures

To avoid this situation in the future:

Understand Transaction Fees: Each blockchain requires its native token for transaction fees (e.g., SOL for Solana, ETH for Ethereum). Ensure you have a small amount of the respective token in your wallet to cover fees before initiating transactions.
Double-Check: Always verify the wallet address and the network before sending any cryptocurrency. Phantom Wallet provides clear indicators of the network you’re on, so make sure it matches your transaction’s intended network.
Stay Updated: Phantom Wallet frequently updates its features and adds support for new networks. Keeping your app updated can help prevent issues related to network compatibility.
Security: Use biometric authentication or Face ID for added security. Never share your secret recovery phrase, as Phantom Support will never ask for it.

Remember, the key to recovering funds sent to the wrong network is acting quickly and following the correct recovery methods. While sending crypto to the wrong network can be stressful, with the right approach, you can often retrieve your assets. Always exercise caution, verify details, and stay informed about the networks you’re interacting with through Phantom Wallet.

Note: This guide is based on general practices and might not cover every possible scenario or network. For specific issues, refer to Phantom’s official support or community forums for tailored advice.

How to Add a Token to Phantom Wallet: A Step-by-Step Guide (January 5, 2025)

Updated: January 5, 2025

Phantom Wallet is a popular Solana-based cryptocurrency wallet that allows users to manage their digital assets seamlessly. Adding tokens to your Phantom Wallet is a straightforward process. Follow this comprehensive guide to learn how to add tokens to your Phantom Wallet.

Table of Contents

  1. Understanding Phantom Wallet
  2. Prerequisites
  3. Adding a Token to Phantom Wallet
  4. Troubleshooting Common Issues
  5. Frequently Asked Questions

Understanding Phantom Wallet

Phantom Wallet is a user-friendly cryptocurrency wallet designed for the Solana ecosystem. It enables users to store, send, receive, and manage SOL and SPL tokens efficiently. With its intuitive interface, Phantom Wallet has become a preferred choice for many Solana users.

Prerequisites

Before adding a token to your Phantom Wallet, ensure you have the following:

  • Phantom Wallet Installed: If you haven’t installed Phantom Wallet, download it from the official website.

  • Solana Network Access: Ensure you have a stable internet connection to interact with the Solana blockchain.

Adding a Token to Phantom Wallet

Using the Phantom Wallet Interface

How to Add a Token to Phantom Wallet: A Step-by-Step Guide (January 5, 2025)

  1. Open Phantom Wallet: Launch the Phantom Wallet extension in your browser.
  2. Access the Token List: Click on the “Manage Token List” icon, represented by a gear or settings symbol, typically located at the bottom or top-right corner of the wallet interface.

  3. Search for the Token: In the search bar, type the name or symbol of the token you wish to add. Phantom Wallet maintains a comprehensive list of verified tokens.

  4. Add the Token: Once you locate the desired token, click the “Add” button next to it. The token will now appear in your wallet’s main interface.

Manually Adding a Token

If the token isn’t listed in Phantom’s default token list, you can add it manually:

  1. Obtain the Token’s Mint Address: The mint address is a unique identifier for the token on the Solana blockchain. You can find this on the token project’s official website or reputable sources like Solana Explorer.
  2. Open Phantom Wallet: Launch the Phantom Wallet extension.

  3. Access the Token List: Click on the “Manage Token List” icon.

  4. Add by Address: Scroll to the bottom and select the “Add by Address” option.

  5. Enter the Mint Address: Paste the token’s mint address into the provided field.

  6. Confirm Addition: Click “Add” or “Confirm”. The token should now appear in your wallet.

Troubleshooting Common Issues

  • Token Not Appearing: Ensure you’ve entered the correct mint address. Double-check for any typos or errors.

  • Unverified Tokens: Adding unverified tokens can be risky. Always verify the legitimacy of a token before adding it to your wallet.

  • Wallet Not Updating: If the token doesn’t appear immediately, try refreshing the wallet or restarting your browser.

Frequently Asked Questions

Q1: Can I add tokens from other blockchains to Phantom Wallet?

A1: Phantom Wallet primarily supports Solana-based tokens (SPL tokens). Tokens from other blockchains aren’t compatible.

Q2: Is there a limit to the number of tokens I can add?

A2: There’s no specific limit, but adding numerous tokens may clutter your interface. Add tokens you actively use or monitor.

Q3: How do I remove a token from my wallet?

A3: In the “Manage Token List” section, locate the token you wish to remove and click the “Remove” or “Delete” option.

Q4: Are there fees associated with adding tokens?

A4: Adding tokens to your wallet is free. However, transactions involving these tokens may incur network fees.

Q5: What should I do if I suspect a token is malicious?

A5: Avoid adding or interacting with suspicious tokens. Conduct thorough research and only add tokens from reputable sources.

By following this guide, you can efficiently manage and add tokens to your Phantom Wallet, enhancing your experience within the Solana ecosystem.

For more information and support, visit the Phantom Wallet Help Center.

How to connect phantom wallet to gmgn.ai

How to Connect Your Phantom Wallet to the GMGN Website
This article explains how to connect your Phantom wallet to the GMGN website, based on a video by HowTo Edu (the original video link has been removed as it was no longer valid).

Here are the steps:

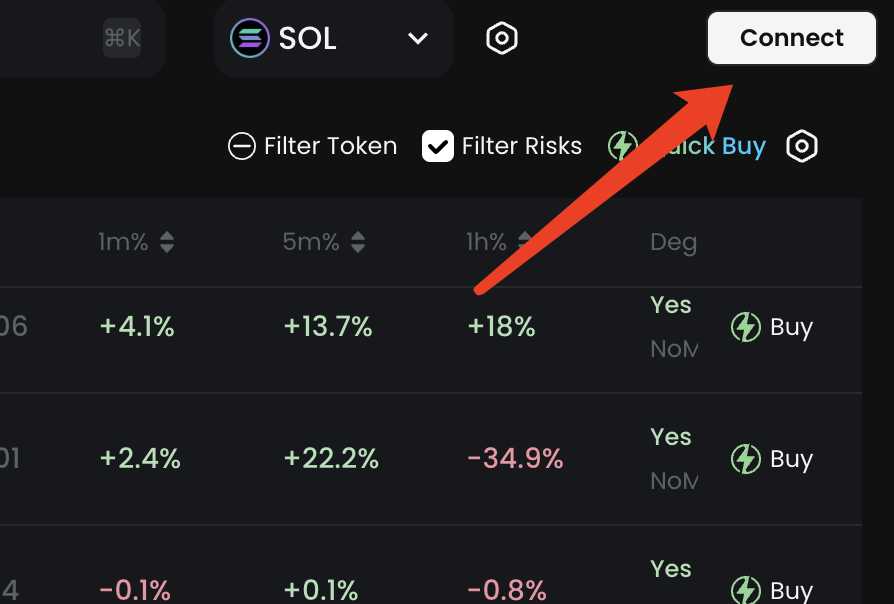
Visit the GMGN Website and Click the “Connect” Button:

Navigate to the GMGN website in your web browser. Look for a button labeled “Connect,” “Connect Wallet,” or something similar, usually located in the top right corner or prominently displayed on the homepage.

How to connect phantom wallet to gmgn.ai

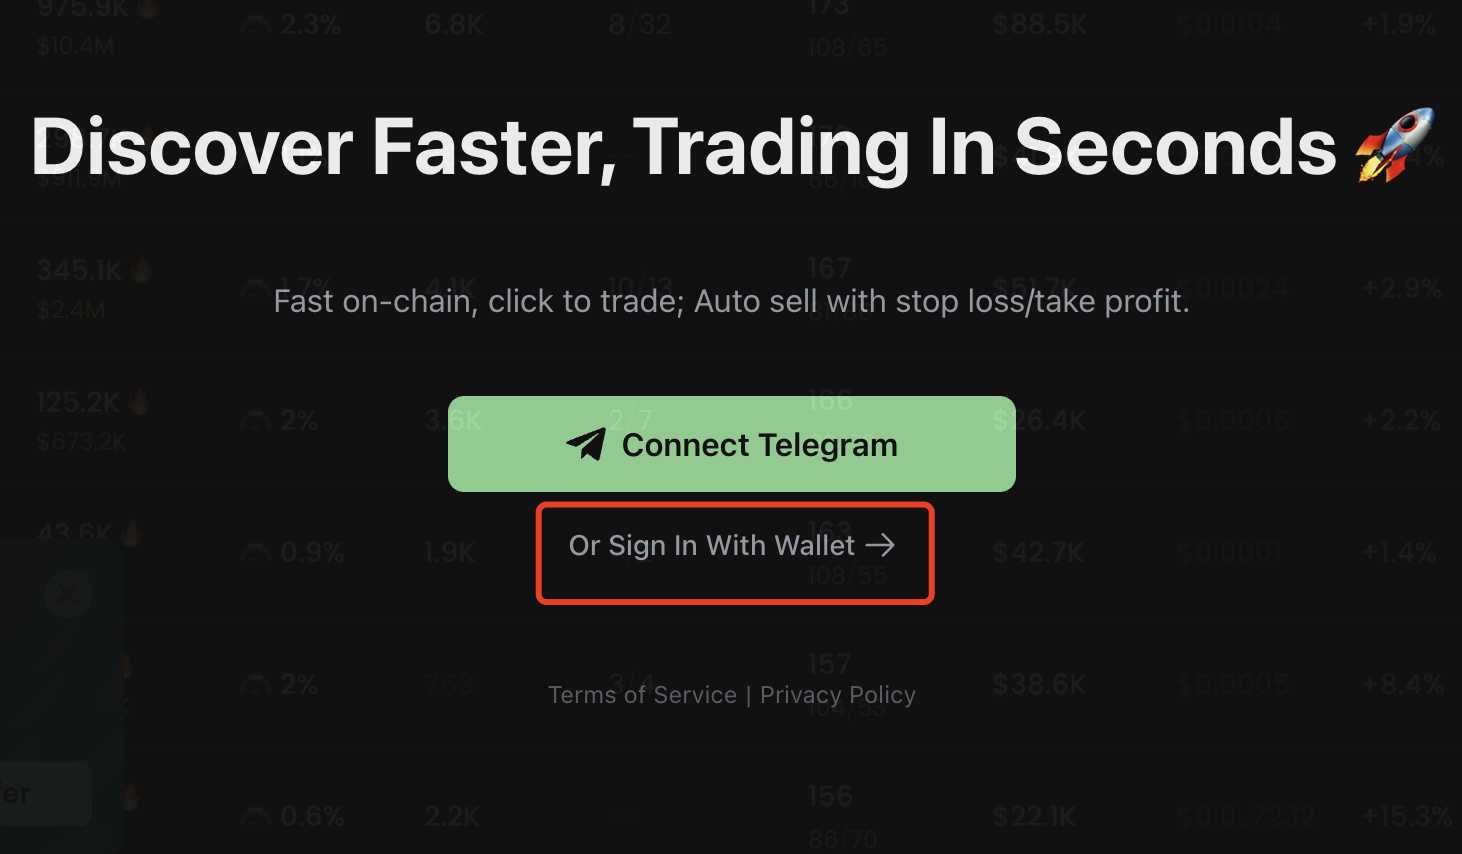
Select “Login with Wallet” or Similar:

After clicking “Connect,” a pop-up or dropdown menu should appear, presenting different connection options. Choose the option that says “Login with Wallet,” “Connect with Wallet,” or a similar phrase.

How to connect phantom wallet to gmgn.ai

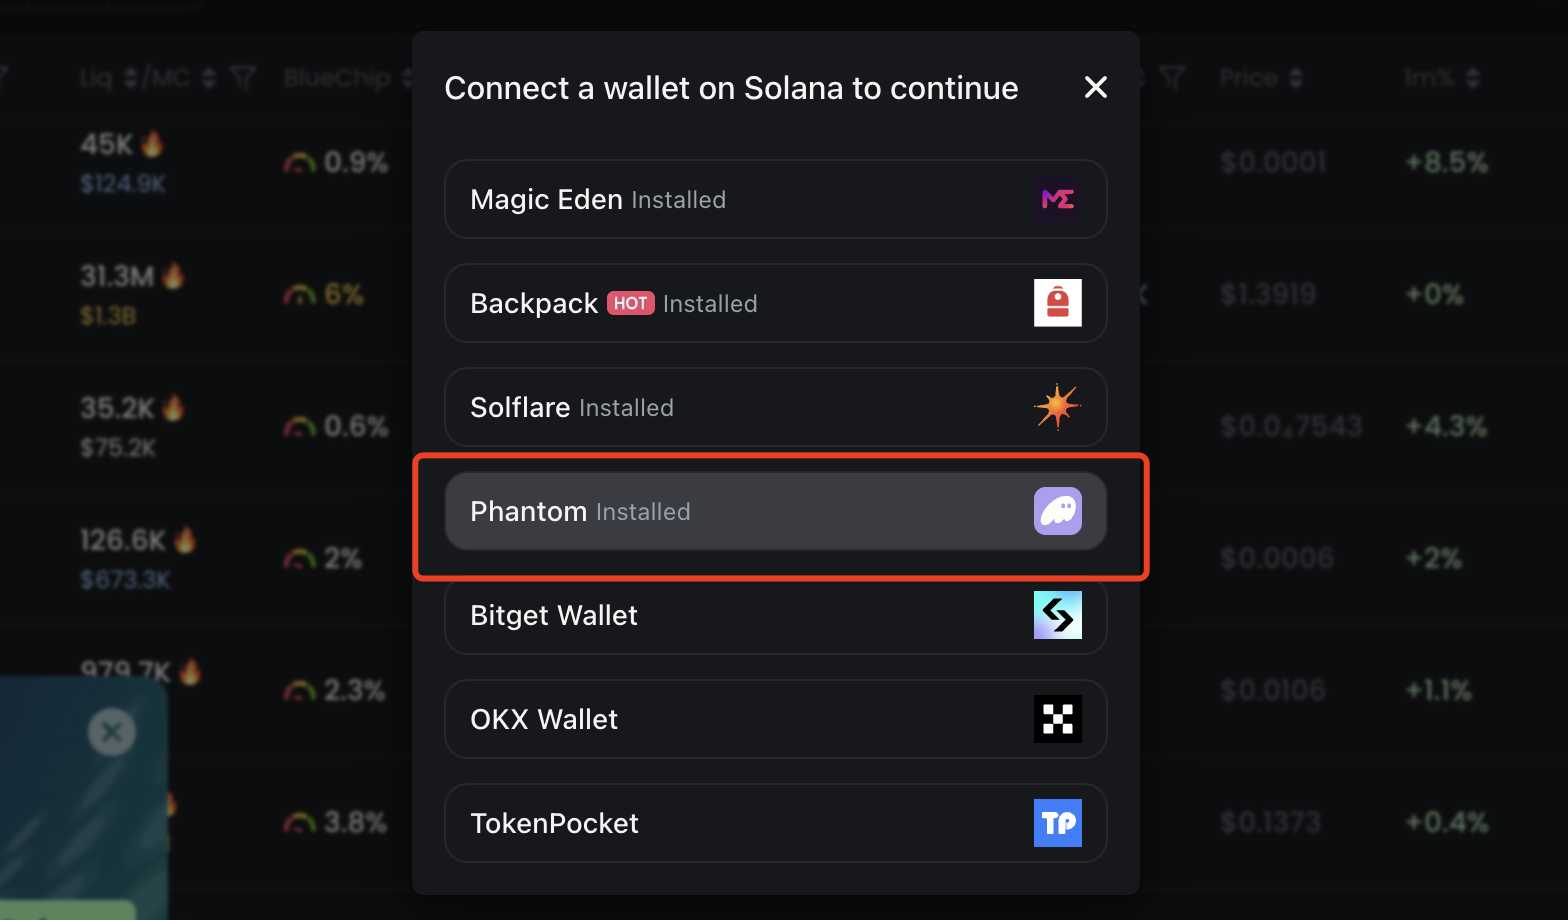
(Hypothetical Screenshot: A screenshot showing a pop-up window with options like “MetaMask,” “WalletConnect,” and “Phantom,” with “Phantom” highlighted.)

Choose Phantom Wallet from the Options:
From the list of available wallets, select “Phantom.”

How to connect phantom wallet to gmgn.ai

Enter Your Wallet Password:

Your Phantom wallet extension should open (either as a pop-up or in a new tab). You will be prompted to enter your Phantom wallet password to authorize the connection.

Confirm the Connection:

After entering your password, Phantom will ask you to confirm that you want to connect your wallet to the GMGN website. Click the “Connect,” “Approve,” or similar confirmation button.

Once the connection is successful, your Phantom wallet will be linked to the GMGN website. You should see your wallet address displayed on the GMGN website, or you may be able to access features that require a connected wallet.

Important Note: Make sure you have pop-ups enabled in your browser for the GMGN website, as the connection process often involves pop-up windows.

Troubleshooting:

If the connection fails: Double-check that you have the Phantom wallet extension installed and that it’s up-to-date. Also, ensure you are on the correct GMGN website (watch out for phishing sites).

If you can’t find the “Connect” button: Look for it in different areas of the website. Sometimes it might be hidden in a menu or require you to navigate to a specific page.

If you continue to have problems, consult GMGN’s official documentation or support channels for further assistance.